Showing posts with label Misc. Show all posts

Tuesday, December 23, 2008

It's (almost) Alive!

Monday morning - I hooked up the last three wires:

  • Keyed +12V to relay box
  • 12V ground to relay box
  • DMOC to 12V ground
I then turned the key, heard the contactor "click" and then - nothing.

I've been here before, of course, so I knew what to do. I hooked up a computer and fired up Azure Dynamic's diagnostic ccShell program. It was registering error code 16 - which I was familiar with from Tim's experience. I checked the grounds, and then set the variable EE2DisableChargedError to 1 which makes the controller ignore the error code 16.

One more time, turning the key on and - noise! Ugly grinding noise, though. The same whether in neutral or in gear, so I'm pretty sure it is coming from the motor itself. I've been here before, too - so I contacted Azure Dynamics tech support. We've had a couple of interactions, with them requesting data dumps & experiments, and me returning data to them.

No results yet - it can move (slowly) forward and backward, but not enough to back it down the driveway. When I get back from vacation, I hope to be able to finish this in the next week or two...

Sunday, December 7, 2008

To-Do List

I also made a list of those last things that need to get done to get the ElectroJeep on the road.

Things that must get done:
  • Finish 12V wiring
  • Hook up power steering
  • Hook up power brakes / heater controls (other vacuum?)
  • Hook up e-brake
  • Install potbox (relocate throttle cable?)
  • Hook up controller wiring harness
  • Finish transmission:
    • Put gasket on tail cone
    • Replace U-joints
    • Torque to final specs
    • Hook up wiring
    • Hook up clutch hydraulics
    • Fill / bleed clutch hydraulics
    • Fill with tranny / t-case fluid
  • Install gauges / controls
    • Including wiring through to engine compartment
  • Torque suspension to final specs
  • Bleed brakes
  • Install battery interconnects
  • Cut & install long 4/0 cables
  • Install PakTrakr
  • Finish charger wiring
  • Shorten 3-phase cable
  • Hook up controller 312V cables
Things that would be nice to have done, but are not required:
  • Install manual t-case cable
  • Replace rotors, drums, and pads

Saturday, November 29, 2008

Controller Mounted

I finally got the controller mounted today. First, I finished attaching the mounting bracket I built a while ago. I cut two smaller brackets to attach to the inside front bumper, and bolted them to the Jeep and to the controller mount:


Next, I measured and cut a piece of 1/8" polypropylene to act as a splash guard under the controller:


Here is the splash guard installed, with the vibration isolation feet attaching it to the mounting bracket:


And here is the controller mounted in its final home. At some point, I'm going to shorten that monster 3-phase cable so I don't have to wrap it 17 times around the engine compartment...

Wednesday, November 26, 2008

Charger Mounted

I took the week of Thanksgiving off so I could get more done on the Jeep. Glorious weather - into the 60s most days (I love Colorado...). One of the first things I did was to install the charger for real. A few weeks ago, I inserted 1/4-20 RivNuts where required for mounting the charger. This week, I drilled 3/4" holes in the trim to match the RivNuts, and installed it:


I also put in a junction box. The reason for the junction box is that the 240V input needs to be split in two - one part for the charger, the other part for the 240VAC relay in the front compartment which tells the Jeep not to allow someone to drive it off while plugged in. The orange cord will connect to the charging plug. The yellow cord goes to the front compartment. The black cord goes to the charger:


And then I installed the charger (it was much easier to install the junction box *before* the charger). I have put one LiquiTight conduit connection where the charging cord comes in. I did not get a photo, but I have another one where the yellow front compartment AC cord goes through. I have not yet hooked up the AMP connector for the DC output - need to get all the batteries connected, first (hopefully this week...):

Sunday, October 5, 2008

Finding Places for Front Components

To finish off Sunday night, I found homes for all the components. First, the vacuum pump and vacuum reservoir. I relocated some electronics that were near the battery (I think it is the starter relay - I'll double-check and, if so, it will be removed permanently):


Second, the power steering pump. This one is tricky. It is fairly heavy (12 pounds) and bulky. I found a place for it along the rack. It will need a rack of its own to hold it in place...


...so Sketchup to the rescue. After drawing a scale model of the power steering pump, I drew some rack pieces around the mounting holes:


Most pieces will be 1" by 1/8" bar stock. The piece on the left is 1/2" by 1/16" box tubing. The bolt on the lower right will go into the main mounting bar of the battery rack:

This is all a little tentative - I need to get some more accurate measurements. But it is a good starting point.

DC-DC Converter Mount

The two threaded rods on the front of the front rack are an ideal place to hang the DC-DC converter. So, I doodled a converter up in Sketchup, and then designed two angle-brackets-with-box-tubes to slide down over the threaded rod and mount the converter:


I then built it. These are two 1.25x1.25 1/8" angle brackets, welded to a 0.5" 1/16" box tube, all 8 inches long:


After mounting and drilling the pieces, I decided 8" was too long, so I cut them back to 7" - this shows the shorter length. 8" would have interfered with the top of the front rack:


And here is the DC-DC converter in its final home. The only 1/4 20 bolts I could find were some grungy old carriage bolts - all the hardware stores are, of course, closed on Sunday night. I'll pick up some better bolts this week:


Note that both components which require cooling (the DMOC445 and the DC-DC converter) are directly behind the original front grill, for high airflow while moving.

Designing Controller Mount

This evening was spent in the front compartment. First up: figuring out how to mount the DMOC445 controller securely. After snooping around, I found these weldnuts on either side of the frame rails in the engine compartment - they were not being used for anything:


So I cut a 3/16" 1.5 by 1.5 angle iron to length, notched one end, and drilled a hole in the other to fit between those two holes:


Here is the bolt going through the hole in the other side:


With this bracket in place, I test placed some smaller 1.25 by 1.25 1/8" bar stock on top of it (and on top of a 1.5" box tube in front to level things out):


After trimming the two smaller angle brackets, I inverted them (so the flat part faced up) and placed the DMOC445 on top. Fits nicely!


I still need to finish the part currently occupied by the 1.5" box tube - possibly just threaded rod with coupling nuts to act as spacers, but that will wait for another weekend. And these pieces need to be rattle-canned.

Sunday, September 21, 2008

Final Battery Layout!

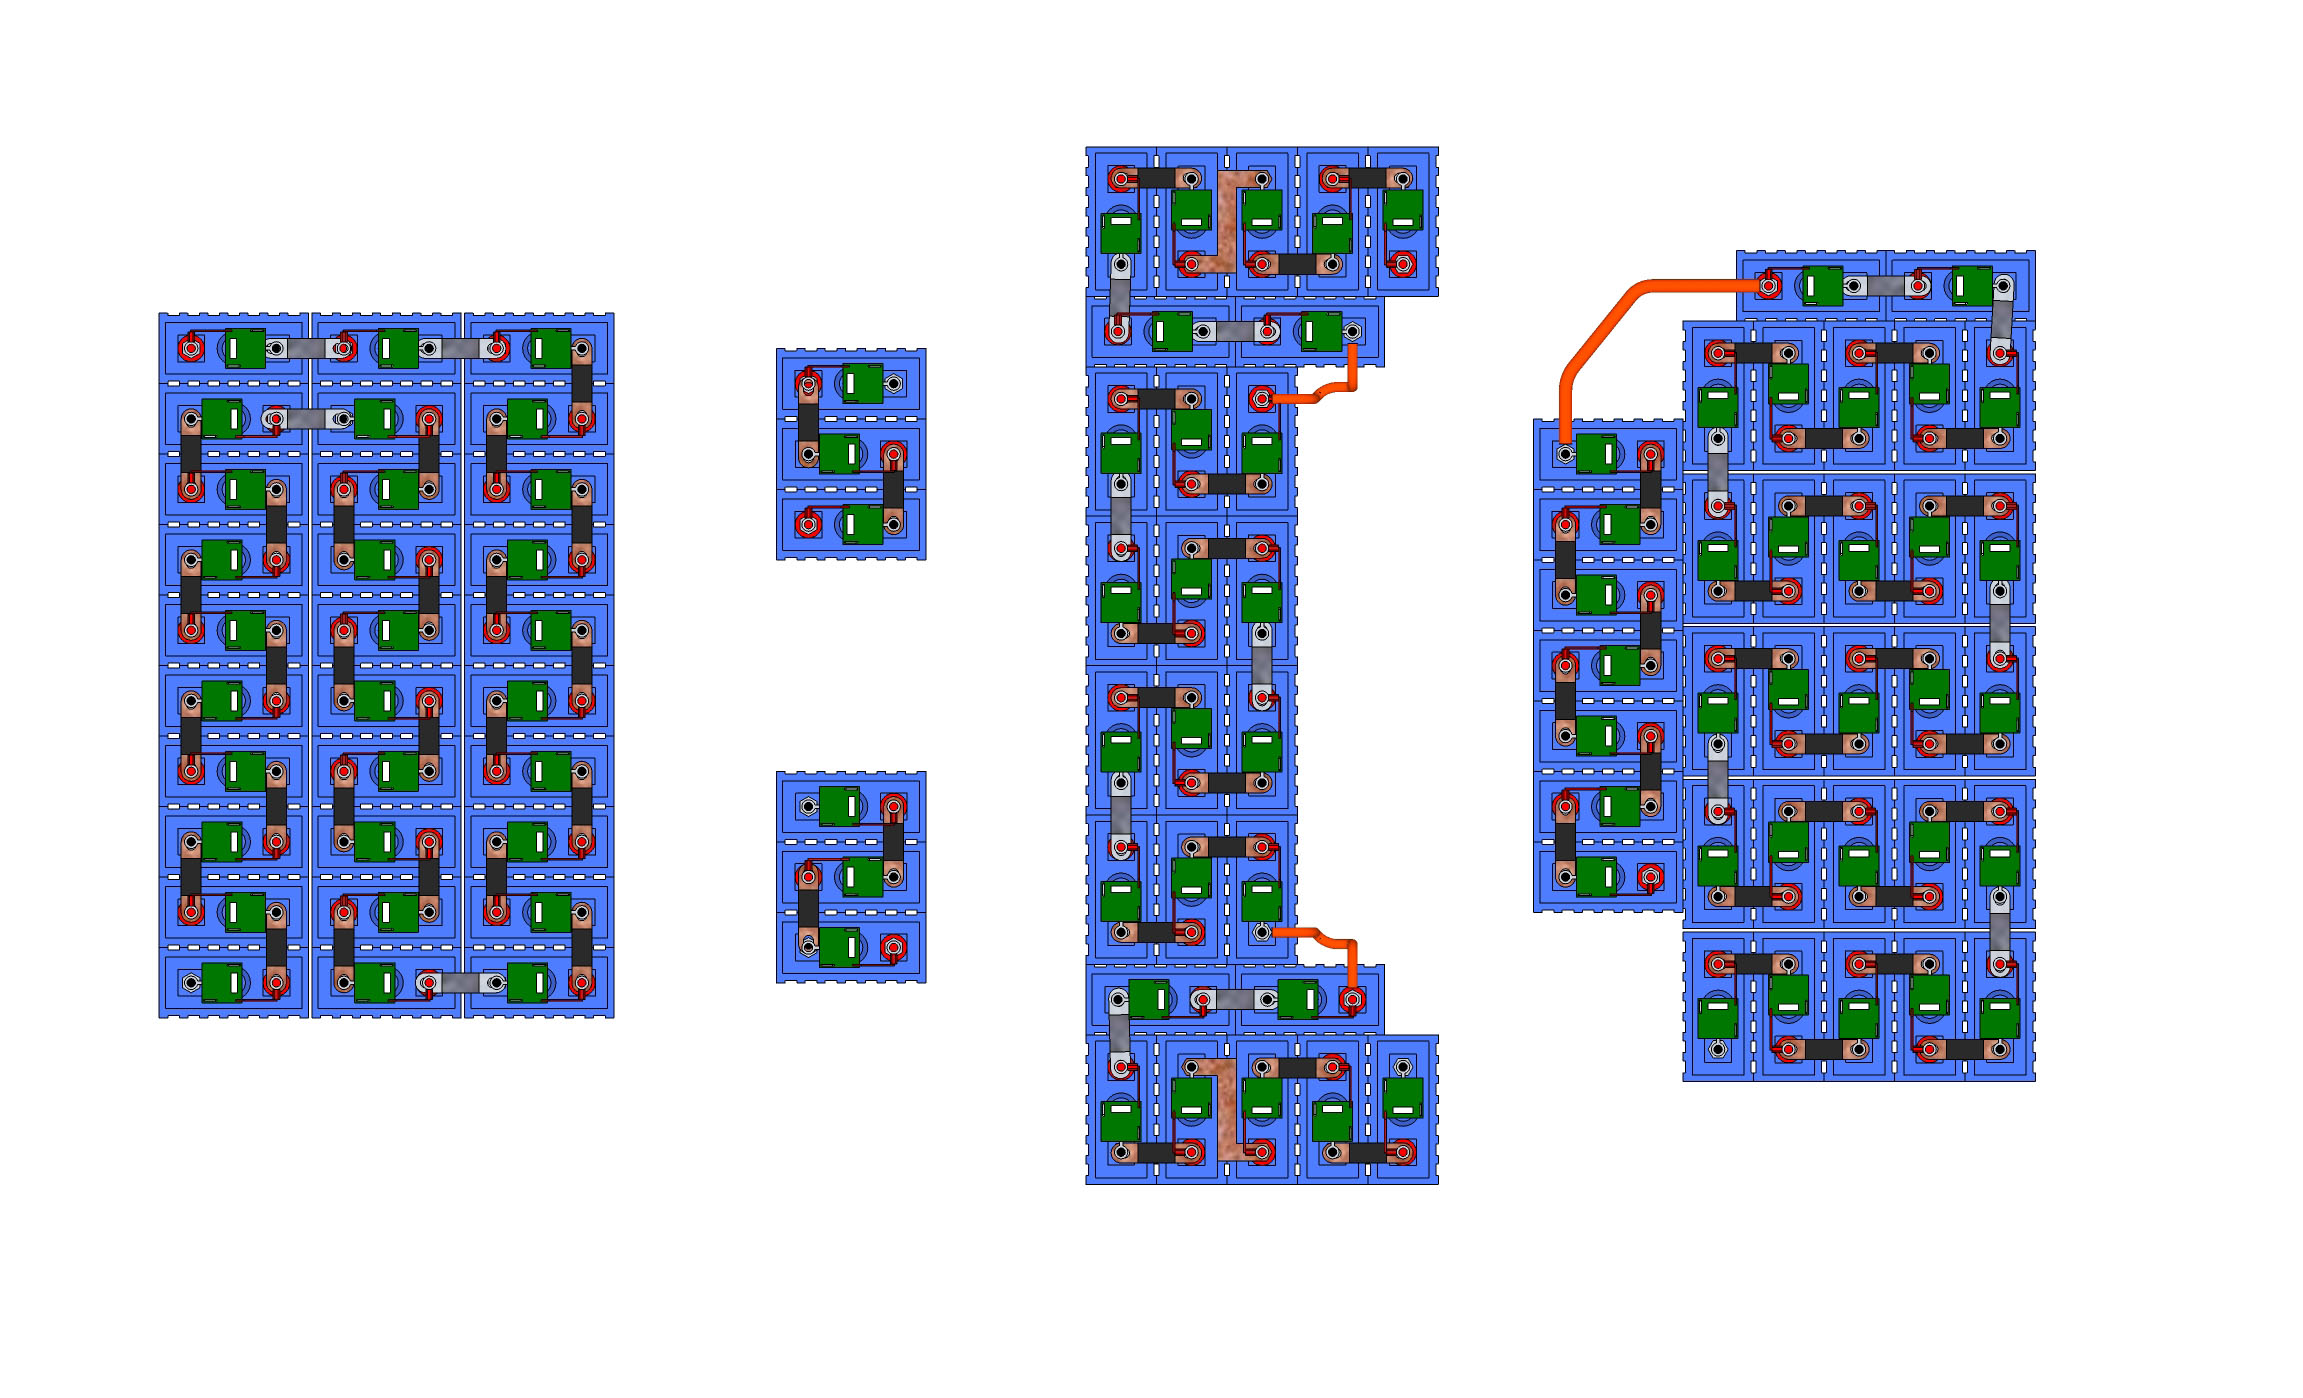
Well, with the racks all basically designed and nearly built, I believe I can declare victory over the battery layout. Here is a picture of it:

You can find the PDF file here. The orange interconnects will be copper strips. Each interconnect will consist of a stack of 3 1" by 1/16" strips. This gets a cross-sectional area of 0.1875" which compares well with the cross-sectional area of 4/0 welding cable (which is 0.166"). The strips will be cut longer than shown and then creatively bent to allow for flex. Each strip will be heat-shrink wrapped for insulation, and then the three will be stacked on top of each other and screwed in to the battery (with a generous dollop of Noalox all over the place).

Here is a picture for example of the battery interconnects that Electro Automotive did for the Volt914 / VoltsPorsche AC. The ElectroJeep interconnects will be different, since the batteries do not have "L" terminals but rather screw-in terminal posts:


As a reminder, here is the evolution of the ElectroJeep battery layout:

Version 1.0, January 2008:


Version 2.0, March 2008:


Version 3.0, July 2008:


There may be a few minor tweaks (the two diagonal interconnects in the lower rear battery rack, on the right side of the picture bother me - way too close even if insulated), but I expect this to be very close to the final layout.

Hey, Rocky, watch me pull an Electric Jeep out of my hat...

Wednesday, September 3, 2008

High Voltage Wiring Diagram

It's getting dark earlier these days, so no time before / after work for actual metal fabrication. So, I spent some time creating the high-voltage wiring diagram. You can get the PDF here.


The parts list is as follows:
  • AC55 AC55 3-phase AC motor from Azure Dynamics
  • DMOC DMOC445 AC controller from Azure Dynamics
  • DC-DC DCDC 750 BC12 DC to DC (200-400V; for use with 12V aux battery) from Azure
  • Htr 2x 400V, 1000W ceramic heaters from Mor Electric
  • Ctctr Tyco Kilovac 500A 320V LEV200 Contactor (overkill...)
  • 400A 2x Ferraz-Shawmut A50QS400-4 500VDC 400A fuses from evsource
  • 30A Littelfuse KLKD030 600VDC 30A fuse from onlinecomponents
  • 1.5A Littelfuse KLKD01.5 600VDC 1.5A fuse from onlinecomponents
  • 50 mV Westach 237-150 150A 50mV shunt from westach.com
  • V Westach 2C5-84 200-400VDC voltmeter from westach.com
  • A Westach 2C6-14 -150-0-+150A DC ammeter from westach.com
  • Charger Manzanita Micro PFC-20 110-240V 20A battery charger
  • 12V, 96V... Battery packs built from 12V Concorde Chairman AGM-1280T batteries

High-current wiring is 4/0 gauge welding cable
Medium-current wiring (charger, DC-DC converter) is 10 AWG primary wire
All other wiring is 16 AWG primary wire

High-current connectors are Cam-Lok400A 600VDC connectors from lightsonretail - NOT INTENDED FOR DISCONNECTING WITH LOAD APPLIED

Medium-current connectors are either Anderson SB-50 (charger) or Yazaki 2-pin (P/N 7222-4220-30) (DC-DC converter)

Saturday, January 19, 2008

Next project - an electric Jeep Cherokee

Having completed my electric Porsche 914 conversion I've got the bug (and my wife Jill wants an electric vehicle to drive around). So, I have another project. Welcome to ElectroJeep, where I will be converting this Jeep Cherokee to electric:


Basic specifications will be:
  • AC55 motor & DMOC440 controller from Azure Dynamics
  • 316 volt flooded lead-acid battery pack (26 12-volt batteries)
  • Charger: likely Zivan NG-3, but still investigating
Right now, I'm in investigation, planning, and ordering parts phase. This will be more challenging than the Porsche, because I am not going with a kit. Also, my wife and youngest daughter will be much more involved in the process, since they will likely be the main drivers of this one.

Stay tuned!

Edit: Jill says she will likely call it "Jeep Lightning".