Wednesday, October 22, 2008

Dash, Part II

I managed to extract the gauge body from the dashboard tonight. Here is the front:

And here is the back - interesting "printed circuit on plastic" technology it has going:


To make room for the depth of the gauges, I had to do some hackery. First, I removed the three clips from the middle (these connected to the fuel gauge). Next, I used a hot knife to remove the surrounds from the former water and oil warning lights:


And here it is - all fitting nicely:


The light at the lower left is the former "fuel low" warning light. I think I'll repurpose it to be the "charge not complete" light. The light at the lower right is the former battery light. It will be repurposed to mean, "ignition key is turned on." There are five empty slots on the light panel to the left. I will use one of them to mean, "the charger is plugged in, so you can't go anywhere" light.

Sunday, October 19, 2008

Dash, Part I

This week I also started work on the dashboard. I need to rip just about the whole thing out to remove the old heater core and install the new ceramic heaters. So, I started disassembling it, removing the dash surround:


and the gauge bezel:


I needed to find a place for these three gauges (from left to right - the 12V voltmeter, the 12V ammeter, and the 200-400V voltmeter):


Also, for the ammeter:


Note that this ammeter does not use a typical shunt. Rather, it uses a Hall-effect sensor, which is much safer at the high 312V potential that the Electrojeep has:

The last thing I needed to find a place for on the dash was the fancy combo switch that Azure provided:


I used a hot knife (basically, a blade on a soldering iron) to enlarge the holes where the water temp warning light and oil pressure warning light had been:


I then used a hole saw to cut a circle in the old gas gauge - this holds the 200-400V voltmeter. I also used the hot knife to cut holes in the surround for the Hall-effect ammeter and the combo switch. Here it all is, test-fit in place:


Still to do on the dash:
  • Make room on the gauge backing for those deep gauges
  • Route 12V wiring from engine compartment to dash
  • Enlarge the holes behind the ammeter and the combo switch so the surround fits again
  • Finish disassembling the dash so I can get at the heater core
  • Reassemble everything
  • Profit!

Misc Parts

This weekend, I finished up some of the miscellaneous things that needed doing. First, I removed the front rack and the driver's side support. I did this because I needed to build the mount for the power steering pump (as seen below). I also need the rack out of the way to remove the heater core, and it will make a lot of the 12V wiring simpler.

With the front rack out, I cut a notch in one of the vertical supports to ensure that the steering rod will always clear it:


I built the mounting for the power steering pump:


I inserted a 3/8-16 rivet nut as the lower attach point for the power steering pump mount:


And I welded the controller mount. I then painted the controller mount, the power steering pump mount, and the two DC-DC converter mounts:


Not shown, but I also took the opportunity to caulk around the under-seat battery boxes to prevent leaks.

Sunday, October 5, 2008

Finding Places for Front Components

To finish off Sunday night, I found homes for all the components. First, the vacuum pump and vacuum reservoir. I relocated some electronics that were near the battery (I think it is the starter relay - I'll double-check and, if so, it will be removed permanently):


Second, the power steering pump. This one is tricky. It is fairly heavy (12 pounds) and bulky. I found a place for it along the rack. It will need a rack of its own to hold it in place...


...so Sketchup to the rescue. After drawing a scale model of the power steering pump, I drew some rack pieces around the mounting holes:


Most pieces will be 1" by 1/8" bar stock. The piece on the left is 1/2" by 1/16" box tubing. The bolt on the lower right will go into the main mounting bar of the battery rack:

This is all a little tentative - I need to get some more accurate measurements. But it is a good starting point.

DC-DC Converter Mount

The two threaded rods on the front of the front rack are an ideal place to hang the DC-DC converter. So, I doodled a converter up in Sketchup, and then designed two angle-brackets-with-box-tubes to slide down over the threaded rod and mount the converter:


I then built it. These are two 1.25x1.25 1/8" angle brackets, welded to a 0.5" 1/16" box tube, all 8 inches long:


After mounting and drilling the pieces, I decided 8" was too long, so I cut them back to 7" - this shows the shorter length. 8" would have interfered with the top of the front rack:


And here is the DC-DC converter in its final home. The only 1/4 20 bolts I could find were some grungy old carriage bolts - all the hardware stores are, of course, closed on Sunday night. I'll pick up some better bolts this week:


Note that both components which require cooling (the DMOC445 and the DC-DC converter) are directly behind the original front grill, for high airflow while moving.

Designing Controller Mount

This evening was spent in the front compartment. First up: figuring out how to mount the DMOC445 controller securely. After snooping around, I found these weldnuts on either side of the frame rails in the engine compartment - they were not being used for anything:


So I cut a 3/16" 1.5 by 1.5 angle iron to length, notched one end, and drilled a hole in the other to fit between those two holes:


Here is the bolt going through the hole in the other side:


With this bracket in place, I test placed some smaller 1.25 by 1.25 1/8" bar stock on top of it (and on top of a 1.5" box tube in front to level things out):


After trimming the two smaller angle brackets, I inverted them (so the flat part faced up) and placed the DMOC445 on top. Fits nicely!


I still need to finish the part currently occupied by the 1.5" box tube - possibly just threaded rod with coupling nuts to act as spacers, but that will wait for another weekend. And these pieces need to be rattle-canned.

Painting racks...

Saturday was Paint-the-Racks Day. It all starts with proper prep - a dose of Marine Clean, followed by a clean water wash and a soak in Metal Ready, and a final clean water wash and a heat-gun dry. And then, the paint. I painted the racks and boxes and stuck the boxes in while still wet (this way, scratches will "self-heal" a bit as the paint levels itself):


Here are the seat racks from below:


The upper rear rack got a pretty white coat to match the white Jeep:


And the top of the front rack now matches the bottom:


This is the last of the major painting - the rest can be done with rattle-cans.

Seat Boxes, III

Friday, KatC and I worked on the seat boxes again. But first, early that morning, I said "bye-bye" to the old internal combustion engine. I tried to find a buyer, but nobody was terribly interested in a 22-year-old underperforming 4-cylinder engine. So, off to the salvage yard it went in my trusty pickup:


After work, attention turned to the seat boxes. Here are both racks and boxes, waiting to be installed:


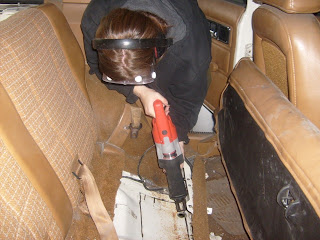
But, before installation, we have one more hole to cut. Here is KatC making the first cuts with a cutoff wheel on the angle grinder (easier to make long straight cuts):


She finished off the corners with a Sawzall:


Proud of her destructive abilities...


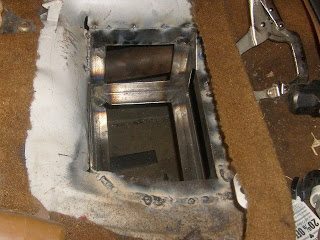
Here's the second rack test-fit in its hole:


After dithering for a while, trying to figure out how to get bolts in the very tight spots around here, I gave up and went for welding. I seam-welded above the frame rail, and then spot welded both inside and outside around the rest of the edges:


And, with that, the construction of the battery racks is complete!